
When you are working on a project in Cricut Design Space that uses text, it is really important to think about the final results you want so that you choose the correct type of font for your project.

If you want to use your Cricut pen in your machine to write the words (on to cardstock for example) you would want to be sure to use a writing font with your text. A writing font is typically thinner and looks like something that could be created with hand printing or hand writing if you had really good penmanship.
If you want your Cricut to cut the shape of a letter, out of cardstock or vinyl for example, you would want to choose a cutting font.
When you put text on to the canvas in Cricut Design Space, if you click on that text it will open up some additional functions you can use in the upper panel. One of these features is the filter. You can choose to filter by your fonts, so you will only see fonts you own, multi layered fonts, single layered fonts or writing fonts. In the image below I have writing fonts selected in the filter so that I am only seeing those fonts to choose from.

If you know that your end project is going to have the Cricut writing with a pen, I would strongly suggest you set this filter so that you are only looking at writing fonts when working your design. Nothing is more frustrating than finding the perfect font and then discovering it is a cutting font when you want to have the words written with the pen.
You can choose to filter by your fonts, so you will only see fonts you own. You can also filter to single layer cuts or multi layer cuts. Both of these are cutting font, but the multi layer fonts will usually include a shadow or offset to go with the basic font so you can add more depth and interest to you design.
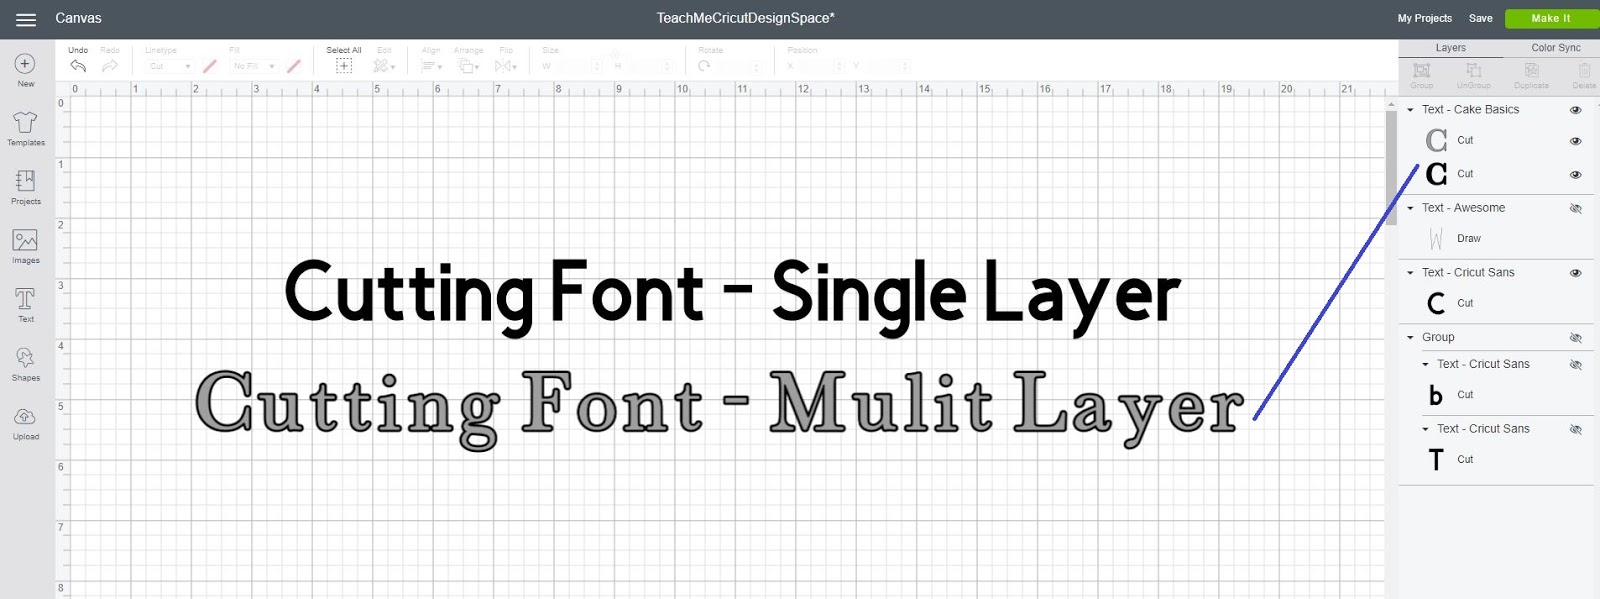
The mulit layered font that I selected for this example has a perfect offset around each letter. This is a great type of font to use with you want to layer two colors over each other for your font.
If you forget if you are using a writing font or a cutting font, you can click on the text and look at the layers panel on the right side of the screen. If it is a cutting font, it will say Cut in the layers panel. If it is a writing font, it will say Draw.


After this, you can play with letter spacing and alignment, or even curve the text, using some of the other functions in the top panel, but I think I will go into those in a different post. Now I am going to include a quick video to show you all of the items we went over in this post.
If you are making a design and the majority of the design is text, start to explore and play around with the large variety of text that is out there. You can download free fonts from some websites. I like to use the ones from DaFont.com. For how to install a font, click HERE. Make sure to download the font, unzip the folder and install the font on to your computer. If you don't see it in Design Space, you might have to close out of the program and re-open it. You can also use a dingbat font as a cutting image like I did for this project HERE.
I hope that this helps you to understand the difference between writing fonts and cutting fonts.
Keep following me and join my Teach Me Cricut Design Space group on Facebook!
Thanks!
Shawn's Teach me Cricut Design Space Group
Crafty Chic's Blog on Facebook // YouTube // Instagram // Crafting Pixie
No comments:
Post a Comment