
I want to show you how I design an image using photographs I had to create this image that could be made on printable iron on material and then ironed onto a shirt or pillow for a wonderful gift that includes a special memory.

I started off by searching in Cricut Design Space for an image of glasses. Then I uploaded the photo that I wanted to use. You could use a photo from a special trip to make a special memory item. This would also look so good with photos of your children for a Mother's Day gift.
When you upload the photo, you are going to choose complex, because you want the final product to have all of the different colors and variations in it. Don't worry if your image comes in rotated like mine did. You can rotate it the correct way in Cricut Design Space after you bring it in on the canvas.

When you click to the next screen it will show you the full image. You don't have to change or do anything here so just click Continue so that you get to this screen

Now you are going to save the image as a print then cut image. This means you will print it on your printer and then load it into the Cricut to cut. My image took a LONG TIME to load and finish up because it was such a large high quality image. Trust me, this is going to be worth the wait.
Now you can select the image and add it to your canvas.
I am going to talk through the steps here, but I also did a video. If you just want to watch the video scroll to the end.
First I rotated the photo the correct way and scaled it down so it would fit inside the lens of the glasses, then I duplicated it. If you look at the layers control panel to the right, you will be able to see that it shows that the two images of the castle are cut/print and the glasses are just a cutting image. This is very important. The glasses need to be a cutting image since you are going to cut the photos down to go inside the lenses.

Next, I move the photos and align things so that the images are just where I want them to show up in inside of the lens openings. Then you can use the Arrange button at the top of the screen to move the glasses to the front or the photos to the back. That will change it from looking like this . . .

to looking like this . . .

Okay, now it is time to cut those photos into the shape of the lenses. Are you ready?
Click on the glasses and duplicate them and move the second pair off to the left. Click on just the glasses over the photos and in the lower right corner of the screen you will see the Contour button turn on. We are going to use that for the next step.

When you click Contour, that will open a new screen that will allow you to turn on and off different parts of the image. We want to turn off the outside of the glasses, so that we just leave the lenses showing.
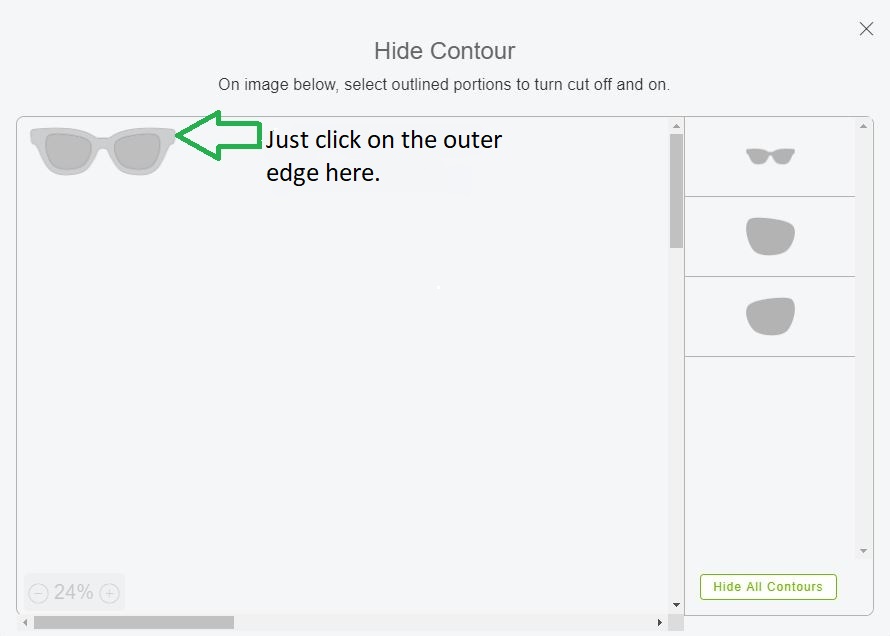
Once you click that outer edge of the glasses, you can click on the X in the upper right corner of this window to close it. Now you canvas will look like this.

Now we click on one photo and a lens at the same time (hold the shift key on your keyboard to do this) and the Slice button will turn on in the lower right corner of the screen.

Do the same thing for the other lens. Now you can delete the lens shapes and the outer part of the photo, and you will be left with lens shaped pictures.

Now you can move the glasses back over the lenses so that everything is all lined up, like in the photo below.

Select all three pieces at the same time and the click the Attach button in the lower right corner. This will hold everything in this exact layout and arrangement. Now if you want to make the whole image larger or smaller, you can do that without having to worry about the lenses not fitting properly inside of the glasses.
Next, while you have all three images selected, click the Flatten button, in the lower right corner of the screen. This will make the entire image something you can print on your printer and then cut out with your Cricut.

If you want to see all of these steps come together, watch the video below.
There are so many ways you could use this project! Create a iron on image for a shirt with your children for a Mother's Day or Father's Day gift. It would also be great on a pillowcase or decorative pillow for a special memory of a trip.
Keep following me and join my Teach Me Cricut Design Space group on Facebook!
Thanks!
Shawn's Teach me Cricut Design Space Group
Crafty Chic's Blog on Facebook // YouTube // Instagram // Crafting Pixie
No comments:
Post a Comment