
Have you ever had a print then cut project that cut out the words inside of your design, instead of cutting the overall shape of your design? If so, then this is the tutorial for you! I am going to show you a few things to look for and check BEFORE you send your project to the printer to make sure that you have everything set up correctly.
For this example, we are going to pretend that we want to make a label for a container in the kitchen. We want the label to be white with the word sage on it. We want to print the word sage in a nice thick bold font on the printer, and then have the Cricut just cut the label shape around the word.

In many of the Cricut message groups, I see people struggling with a project just like this. They design things and have it looking how they want it in Design Space, and it prints out fine, but when they cut it on the Cricut it will cut both the shape of the label and the words sage that is inside of the label. So let's look at why this is happening.
In our example, when we start off with two images from Cricut Design Space, they both come in as a cutting image. We can tell that by looking at the layers panel to the right. There are two items shown there, and they both say cut after them. Also, if we look at the label shape, we can see the grid lines from the Cricut Design Space canvas through the shape. This tells us that the shape is not solid. Let's start by changing that, since we are going to want the Cricut to cut a solid label piece.
Click on the label shape, and in the lower right corner you will see the Contour button.

Click on that so that you can turn and that will allow you to turn parts of the cut on and off. (watch the video at the end of this tutorial and it will show you) This will change your label to a solid piece like what I have shown in the next image.

Now, since we do not want to print out a colored label, we want the shape of the label to be the white paper, we need to click on the label and at the top of the screen change the color to white. Just click on the box that I circled in blue in the image below to change the color.
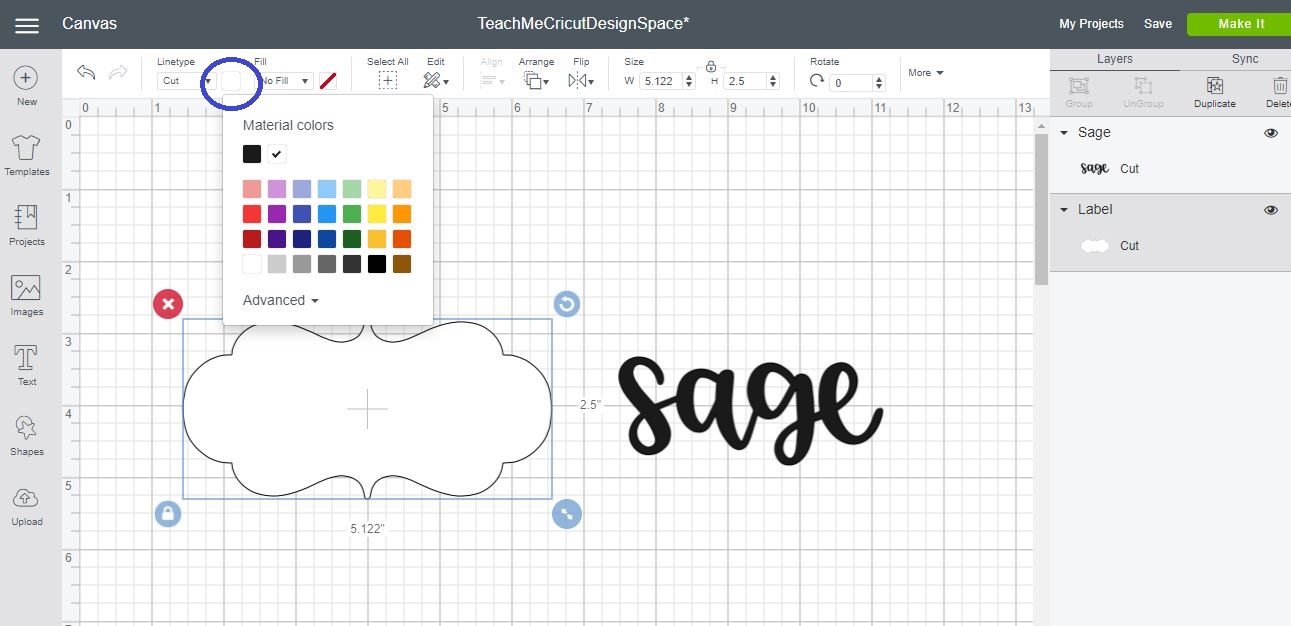
Now we are going to start to change these from cutting images to print then cut images. First, right next to where you changed the color of the label to white, click on the Fill and change that from No Fill to Print.

Once you do that, look at the layers panel on the right hand side. See how it now says Cut | Print next the image? That tells you that it has changed over from a cutting image to a print then cut image.
Now click on the word sage, and go back to the Fill and change it from a No Fill to Print. Now your screen should look like this

Now let's move the word sage over the label and position it where we want it on the label, and then after I have it positioned I am going to select both the label and the word sage and click on the Attach button in the lower right corner. I circled it in the image below to help you find it.

This will hold the position of the word sage on the label and tell the Cricut where we want it placed within the label. Now, this is the point where most people would stop and think they can send it to the printer and then cut it on their Cricut. I can tell you that if you did that, the Cricut would still cut the label and the word sage out. How do I know that? Let's look at the layers panel on the right hand side after we have attached the word sage to the label . . .
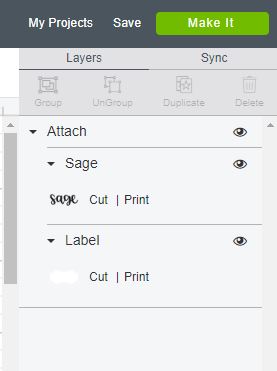
It tells us that the two images are attached to each other, but you can see that it still lists each one separately as a different layer, with both of them saying Cut | Print after them.
This means it is still going to Cut both of them out. Two lines on the layer panel means two layer to cut out.
We do not want that. We want it to just cut the label.
So let's click on both items at the same time and select the Flatten button in the lower right corner and see what happens. I circled the Flatten button in the image below to help you find it.

After you select Flatten, look at the layers panel on the right hand side. You can see that everything is now all one image. There is only one layer for everything!

So now if you send it to the printer, it will print the word sage and there will be a large black registration box around the word sage. Then when you put this on the Cricut cutting mat, the Cricut will read the registration box and then know where to cut the label shape.
And if you prefer video tutorials, you can watch this . . .
I hope this helped you to learn something new about how to check your Print then Cut projects before sending them to the printer so that you are not frustrated with the end results not being what you wanted.
Keep following me and join my Teach Me Cricut Design Space group on Facebook!
Thanks!
Shawn's Teach me Cricut Design Space Group
Crafty Chic's Blog on Facebook // YouTube // Instagram // Crafting Pixie
I am new on Cricut. When you say print, does that mean you need the machine that has the pin on it? Mine just has the blade.
ReplyDeleteFor print then cut, you need to have an Inkjet printer, and a white sheet of 8.5 x 11 inch Printable Media in the Printer. Cricut Design Space, configures that image for your Printer and places a black outline box around the image which you will see on the printed image as it comes from the Printer (and you will see it in the Print preview) That black out line is the Registration mark. You place that printed sheet on your Cricut mat, set the cut setting for what you media you are cutting, cardstock, sticker sheets, printable iron on etc. Then your Cricut machine scans that black outline in several places and then proceeds to cut out the image inside that black outline box. There are size limitations of the Print then Cut feature. Your images can not take up more space than the printable area allowance of 6.75 x 9.25 inches. Anything larger, you will get an error message in Design Space and will not be able to complete the project until you reduce the size.
Delete