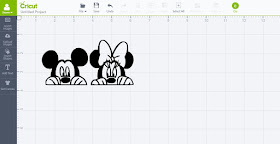
I finally had time to play with my Cricut Explore a little more, and I wanted to try uploading a image I found on the internet and converting it to a cutting file.
I found an image of Minnie and Mickey Mouse that looked like they were peeking over the edge of a window.
I thought this would look really cute in the window panes of a cabinet in my kitchen. I had some Cricut window cling material I wanted to test out also, so this project is really about trying my hand at two things . . . using the Cricut Design Space™ software to convert an image, and using a product I have never used before.
First, find the image you want to use on the internet and save it to your computer. Next, log into the Cricut Design Space™ and you will see a button on the left hand side that says Upload Images. I did a screen shot below . . . it is the button that the pink arrow is pointing to.
Once you click on this, you will be asked to upload the image. Just navigate to the folder where you saved the image and click on it to upload it to Design Space.
Cricut Design Space™ will then ask you how complex your image is . . . is it a basic black and white coloring book style image, or does it have lots of layers and shading? Select the complexity that matches your image. In my case, with this image, I selected simple.
Click continue in the lower right corner of the Design Space screen.
Now you will be on the Select and Erase screen of Cricut Design Space™, which is the image in the screen shot below. In this step, you are removing the negative space from the image so that you leave only the lines that you want to cut. First I clicked on the background . . . .
When Cricut Design Space™ changes the white background to a checkerboard pattern when I click on it, telling me that it will not cut this portion of the image.
Use the zoom buttons in the upper right hand corner of the Cricut Design Space™ screen to zoom in and select smaller areas of the image, suck as the white of the eyes and the small spaces between Minnie's eyelashes. Once you feel like you have clicked on all of the negative spaces that you do not want cut out, click on the Continue button in the lower right hand side of the Cricut Design Space™ screen.
The next screen you will see is the Save and Name screen. Since the Explore can not just cut, but can also do a Print and Cut, in this step you will tell Design Space if you are saving this image as a cut file or a print/cut file. As you can see from the screen shot below, I selected the cut file. Off to the right hand side is a space where you can give this file a name and add tags to the image to allow you to more easily find it and search for it.
Now, how do you put that image on the cutting mat so you can actually cut it? I had a hard time finding where the Design Space software save the image, until I remembered there is a sort/filter option.
When you are in Cricut Design Space™ looking for an image, look over in the upper right hand corner and you will see a "funnel" icon. I have it shown in the screen shot below just under the pink arrow. If you click on this you can select specific groups of images. I selected the category Uploaded to see just images that I have uploaded on my own . . . .
Since I have only uploaded one image so far, it was very easy to find the Mickey and Minnie image I wanted to select (see screen shot blow)
Next, click the Insert Image button in the lower right hand corner of the Design Space screen and it will move this image onto the cutting mat screen in Cricut Design Space™.
Now you can change the size of the image to match the project you are working on, or mirror the image if you wanted to reverse the way Minnie and Mickey are looking. Once you have the image adjusted to the size you want, simply cut away!
I actually cut this image from cardstock and also cut it out of Cricut Window Cling material. Here is how it looked from cut from black cardstock.
And here is how it looks cut from the white Cricut Window Cling material, and placed on the window pane in my kitchen cabinets.
I applied the images cut from Cricut Window Cling material to the window panes on some cabinets I have in my kitchen. Now it looks like Minnie and Mickey are peeking over the bottom window pane.
When I first applied Minnie and Mickey they did not stick very well, so I asked in a Cricut Facebook group I am in if anyone else has had problems with this product sticking to glass. One person suggested I add a little water . . . so I cleaned the glass so that it would be slightly damp and tried applying the Cricut Window Cling image again . . . it worked like a charm! PERFECT!!!!


Very cute! Thank you so much for posting the steps you took to do this project - they answered so many of my questions! =)
ReplyDeleteadorable! Thanks for sharing with us at #CCBG
ReplyDeleteThank you so much for this tutorial. I love how you showed us exactly what you meant in screen shots. It helped so much. Your explanations were very clear and informative. I am going to try something like this and will pin this to my Pintrest board for reference! Thanks!!!
ReplyDeleteHello. Just found your post on a Facebook group. Thank you for posting your steps!
ReplyDelete